Unlocking Creativity: My Experience with the Raspberry Pi Zero Display for DIY Projects
When I first stumbled upon the Raspberry Pi Zero, I was instantly captivated by its tiny form factor and vast potential. This remarkable little computer, often no larger than a stick of gum, has opened up a world of possibilities for makers, hobbyists, and tech enthusiasts alike. One of the most exciting aspects of the Raspberry Pi Zero is its ability to seamlessly integrate with various displays, transforming it into everything from a mini media center to a customizable dashboard. In this article, I’ll explore the fascinating realm of Raspberry Pi Zero displays, delving into how they can enhance projects and spark creativity. Whether you’re a seasoned developer or a curious beginner, join me as we uncover the myriad ways this diminutive powerhouse can bring your ideas to life through visual innovation.
I Explored the Features of the Raspberry Pi Zero Display and Share My Honest Recommendations Below

Hosyond 3.5 Inch 480×320 Touch Screen TFT LCD SPI Display Panel for Raspberry Pi A, B, A+, B+, 2B, 3B, 3B+,4B,5

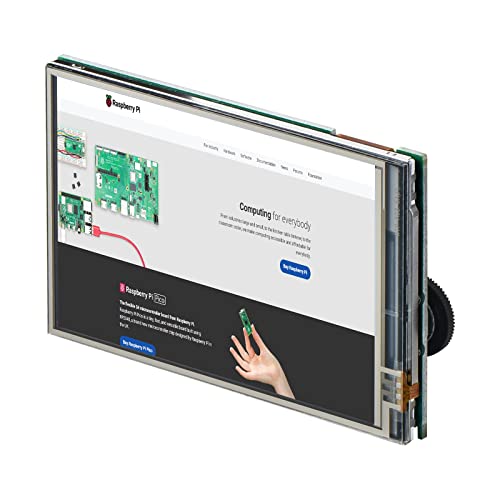
Hosyond 7 Inch IPS LCD Touch Screen Display Panel 1024×600 Capacitive Screen HDMI Monitor for Raspberry Pi5/Pi4/Pi3/ZERO W, BB Black, Windows 10 8 7
iUniker 3.5 Inch Touchscreen for Raspberry Pi Zero With Backlight Knob – 60+ FPS, 480×320 Resolution, High Speed Screen for Pi Zero W 2/W/1.3

1.44inch LCD Display HAT for Raspberry Pi 3B+/3B/2B/3B+/Zero/Zero W,128×128 Pixels SPI Interface RGB, 65K Display Color ST7735S Driver
1. Hosyond 3.5 Inch 480×320 Touch Screen TFT LCD SPI Display Panel for Raspberry Pi A, B, A+, B+, 2B, 3B, 3B+,4B,5
As a tech enthusiast and someone who enjoys working with Raspberry Pi devices, I recently came across the Hosyond 3.5 Inch 480×320 Touch Screen TFT LCD SPI Display Panel. This product has captured my attention for several reasons, and I believe it could be a game-changer for anyone looking to enhance their Raspberry Pi projects. With its compact size, impressive resolution, and user-friendly features, this display panel truly stands out in the crowded market of Raspberry Pi accessories.
The first thing that strikes me about this touch screen is its size and resolution. At 3.5 inches with a 320×480 resolution, it strikes a perfect balance between portability and clarity. The TFT LCD technology ensures that the display is vibrant and clear, making it ideal for various applications—from simple projects to more complex implementations. Being able to interact with my Raspberry Pi via a touch interface adds a whole new layer of convenience and functionality, especially for those of us who prefer a more hands-on approach.
One of the most attractive features of the Hosyond display is its ease of use. I appreciate that no external power supply is required; I can simply plug it into my Raspberry Pi board and get started right away. The provided driver installation tutorial is straightforward, making it accessible even for those who may not be as technically inclined. This plug-and-play capability is particularly beneficial for beginners who might feel overwhelmed by more complicated setups.
Moreover, the compatibility of this touch screen with a variety of Raspberry Pi models—including the Pi5, Pi4B, Pi3B+, Pi3, Pi2, Pi1, Zero, and Zero W—makes it a versatile choice. Whether I’m working on a hobby project or a more advanced application, I can confidently use this display knowing that it will fit my existing setup seamlessly. Additionally, the compatibility with different operating systems such as Raspbian, Ubuntu, and Kali Linux broadens the scope of projects I can undertake with this display.
I also appreciate the inclusion of a touch pen, which enhances the user experience by allowing for precise interactions with the screen. It’s great that Hosyond not only provides the hardware but also offers a project , code, and tutorial. This comprehensive support means I won’t have to search far and wide for information; everything I need to get started is included in the package. Furthermore, the promise of technical support is reassuring; knowing that I can reach out for help if I encounter any issues adds a layer of confidence to my purchase.
In summary, the Hosyond 3.5 Inch 480×320 Touch Screen TFT LCD SPI Display Panel for Raspberry Pi is an excellent investment for anyone looking to enhance their projects. It combines ease of use, broad compatibility, and excellent technical support into one package. Whether you’re a beginner or an experienced maker, I genuinely believe this product can elevate your Raspberry Pi experience. If you’re considering adding a touch screen to your toolkit, I highly recommend giving this one a try—you won’t be disappointed!
Feature Description Size 3.5 inches Resolution 320×480 Type TFT LCD Resistive Touch Screen Power Supply No external power required Compatibility Raspberry Pi A, B, A+, B+, 2B, 3B, 3B+, 4B, 5 Operating Systems Raspbian, Ubuntu, Kali Linux, etc. Included Accessories Touch pen, project , code, tutorial Technical Support Available for troubleshooting
Get It From Amazon Now: Check Price on Amazon & FREE Returns
2. Hosyond 7 Inch IPS LCD Touch Screen Display Panel 1024×600 Capacitive Screen HDMI Monitor for Raspberry Pi5/Pi4/Pi3/ZERO W, BB Black, Windows 10 8 7
When I first came across the ‘Hosyond 7 Inch IPS LCD Touch Screen Display Panel’, I was immediately struck by its versatility and functionality. This monitor is designed not only for enthusiasts of Raspberry Pi but also for anyone who needs a reliable HDMI display. The 7-inch IPS LCD standard display with a hardware resolution of 1024 × 600 is impressive enough, but the capability to configure it up to 1920×1080 makes it a valuable asset for various applications. Whether I am working on a DIY project or simply need a secondary display, this monitor offers an impressive visual experience.
The capacitive touch screen feature is another standout aspect that I find incredibly useful. With support for up to five-point touch, it provides a responsive and intuitive user experience. I can easily navigate through applications or even play games without any lag, which is something I often struggle with in other monitors. The added functionality of backlight control is a thoughtful touch, allowing me to save power when I don’t need the backlight on. This feature could be particularly beneficial for users who are conscious of their energy consumption and want to prolong the life of their display.
One of the reasons I believe this product stands out is its compatibility with a wide range of devices. It supports not just Raspberry Pi (including models Pi5, Pi4, Pi3, and ZERO W) but also BB Black, Banana Pi, and various mainstream mini PCs. This flexibility means that I can use it for a multitude of projects, whether for programming, media consumption, or even as a general-purpose monitor for my computer. The plug-and-play feature is a major convenience, eliminating the need for complicated setups or drivers—something I really appreciate during busy workdays.
Moreover, the monitor’s capability to work seamlessly with different operating systems, including Raspbian, Ubuntu, Kali-Linux, and Windows 10 IoT, makes it a versatile tool for developers and hobbyists alike. I can switch between systems without worrying about compatibility issues, which enhances my workflow and saves me time. Its ability to function as a PC monitor supporting Windows 7, 8, and 10 with five-point touch is also a significant advantage, especially for those who want a multi-functional display.
I genuinely believe that the Hosyond 7 Inch IPS LCD Touch Screen Display Panel is an excellent investment for anyone looking for a reliable, high-quality display. Whether you are a tech enthusiast, a developer, or someone who simply needs an extra screen, this monitor has features that cater to all those needs. Its compact size, impressive resolution, and touch capabilities make it suitable for both casual and professional use. If you’re contemplating making a purchase, I would strongly encourage you to consider this monitor. It could very well enhance your setup and streamline your projects.
Feature Description Size 7 inches IPS LCD display Resolution 1024 × 600 (up to 1920×1080 software configuration) Touch Capability Capacitive touch screen, maximum support for 5-point touch Backlight Control Can turn off backlight to save power Compatibility Supports Raspberry Pi, BB Black, Banana Pi, and other HDMI devices Operating Systems Compatible with Raspbian, Ubuntu, Kali-Linux, Windows 10 IoT, and more
Get It From Amazon Now: Check Price on Amazon & FREE Returns
3. iUniker 3.5 Inch Touchscreen for Raspberry Pi Zero With Backlight Knob – 60+ FPS, 480×320 Resolution, High Speed Screen for Pi Zero W 2/W/1.3
As a tech enthusiast, I’ve always been on the lookout for accessories that can enhance my Raspberry Pi projects, and the iUniker 3.5 Inch Touchscreen for Raspberry Pi Zero stands out as a remarkable addition. With its sleek design and impressive specifications, this touchscreen is not just an accessory; it’s a game-changer for anyone working with Raspberry Pi models like the Zero WH, Zero W, and Zero W 2.
One of the standout features of this touchscreen is its resolution. At 480×320, it offers a Super HD experience that is perfect for a variety of applications. Whether I’m building a DIY gaming console, a home automation system, or even a portable media center, the clarity and detail provided by this screen make all the difference. The 60+ frames per second (fps) capability ensures that animations and transitions are smooth and fluid, which is essential for maintaining a seamless user experience. I can only imagine how much more engaging my projects will be with such a responsive display!
Portability is another significant advantage of the iUniker touchscreen. It’s designed to fit perfectly with the Raspberry Pi Zero models, making it an ideal portable monitor. I love the idea of taking my projects on the go, and this touchscreen makes it easy to do just that. Whether I’m showcasing my work to friends or using it for personal projects while traveling, the compact size and lightweight nature of this touchscreen are incredibly convenient. It’s a solution that aligns perfectly with the needs of makers and hobbyists who value versatility.
The customized circuit board is another highlight of this product. Designed specifically for high-speed performance, it enhances the touchscreen’s capabilities and ensures compatibility with the Raspberry Pi Zero series. This attention to detail means I can trust that my setup will work smoothly without any hiccups. Plus, knowing that it’s crafted for the Raspberry Pi Zero adds a layer of reliability that is always reassuring for me when I’m experimenting with new projects.
However, it’s essential to note that this touchscreen is specifically designed for the Raspberry Pi Zero and its variants. This focused compatibility ensures that I am getting a product that is optimized for my specific needs, rather than a one-size-fits-all solution that might not perform as well. This attention to niche markets is something I truly appreciate in the world of tech accessories.
Overall, I genuinely believe that the iUniker 3.5 Inch Touchscreen is an invaluable addition to any Raspberry Pi enthusiast’s toolkit. Its combination of high resolution, fast response time, portability, and dedicated design for the Raspberry Pi Zero series makes it a standout choice. If you’re looking to elevate your projects and create engaging interfaces, I can’t recommend this product enough. It’s an investment that will undoubtedly pay off in the quality and enjoyment of your Raspberry Pi adventures.
Feature Description Screen Size 3.5 inches Resolution 480×320 pixels Frame Rate 60+ fps Compatibility Raspberry Pi Zero WH / Zero W / Zero W 2 Portability Designed for easy transport and setup Circuit Board Customized for high-speed performance
Get It From Amazon Now: Check Price on Amazon & FREE Returns
4. 1.44inch LCD Display HAT for Raspberry Pi 3B+/3B/2B/3B+/Zero/Zero W,128×128 Pixels SPI Interface RGB, 65K Display Color ST7735S Driver
When I first encountered the 1.44inch LCD Display HAT for Raspberry Pi, I was immediately intrigued by its potential for various projects. This compact display packs a punch with its 128×128 pixel resolution and stunning RGB color capabilities. Being compatible with several Raspberry Pi models, including 3B+, 3B, 2B, Zero, and Zero W, it opens up a world of possibilities for makers, hobbyists, and even professionals looking to enhance their projects with a vibrant visual interface.
The display’s integration with the SPI interface ensures that it communicates effectively with the Raspberry Pi, making the setup process straightforward and hassle-free. I appreciate how easy it is to connect this HAT directly onto my Raspberry Pi, thanks to its standard connectivity. This feature allows me to focus on my project rather than getting bogged down with complex wiring or configuration issues, which is crucial when I’m eager to bring my ideas to life quickly.
The ST7735S driver is another highlight of this product. It supports a wide range of colors—65K to be exact—allowing for a rich and detailed representation of graphics and texts. Whether I am displaying simple status updates, colorful graphics, or intricate designs, this display does not disappoint. The backlight, powered by LED technology, ensures that my visuals remain clear and vibrant, even in lower light conditions. This capability is particularly useful for projects that may be used in varying environments.
One of my favorite features is the inclusion of a joystick and three push buttons, which adds an interactive dimension to the display. This functionality opens up a myriad of possibilities for user input, making my projects more engaging. For instance, I can design an interface where users can navigate through menus or control applications directly from the display. This level of interactivity transforms a simple display into a comprehensive control panel, enhancing the user experience significantly.
For those who may be new to using displays with Raspberry Pi, the online documentation and user manual provide an excellent resource for getting started. I found the information to be clear and helpful, guiding me through the initial setup and providing insights into advanced functionalities. This support is invaluable, especially for beginners or those who may feel daunted by the technical aspects of integrating a display into their projects.
the 1.44inch LCD Display HAT for Raspberry Pi is an exceptional addition to any tech enthusiast’s toolkit. Its versatility, ease of use, and impressive display quality make it suitable for a wide range of applications—from simple DIY projects to more complex systems requiring real-time data visualization. If you’re considering enhancing your Raspberry Pi experience, I strongly encourage you to explore this product further. You won’t be disappointed with the creative opportunities it presents!
Feature Description Display Size 1.44 inch diagonal Resolution 128×128 pixels Color Depth RGB, 65K colors Driver ST7735S Interface SPI Operating Voltage 3.3V Interactive Features 1x joystick (5-position), 3x push buttons Documentation User Manual
Get It From Amazon Now: Check Price on Amazon & FREE Returns
How Raspberry Pi Zero Display Has Helped Me
When I first discovered the Raspberry Pi Zero Display, I was intrigued by its potential to transform my everyday tasks. The compact size and affordability of the Raspberry Pi Zero made it an ideal choice for personal projects. I found that it allowed me to create a variety of custom applications without breaking the bank. Whether I wanted to build a digital photo frame or a smart mirror, the possibilities felt endless.
One of the most significant benefits I’ve experienced is its versatility. I’ve used the Raspberry Pi Zero Display to set up a mini dashboard that shows real-time weather updates and calendar events. This has been incredibly useful for keeping track of my schedule at a glance. The ability to program it according to my needs means I can continually adapt and improve its functionality, making my daily life more organized and efficient.
Moreover, the community support surrounding Raspberry Pi projects has been invaluable. I’ve learned so much from tutorials and forums, which have guided me through troubleshooting and expanding my projects. This sense of connection with other enthusiasts has not only enhanced my technical skills but has also fostered creativity, allowing me to experiment with new ideas and share my experiences. Overall, the Raspberry Pi Zero Display has been a game-changer for me,
Buying Guide for Raspberry Pi Zero Display
Understanding My Needs
When I first decided to integrate a display with my Raspberry Pi Zero, I took a moment to think about what I actually needed. Was I looking for something compact for a small project, or did I want a larger screen for more extensive applications? Understanding my specific use case helped me narrow down my options.
Types of Displays
I found that there are several types of displays compatible with the Raspberry Pi Zero. The most common types include LCD and OLED screens, each offering distinct advantages. For instance, LCDs are great for color and brightness, while OLEDs provide better contrast and viewing angles. I considered what would work best for my projects.
Screen Size and Resolution
Choosing the right screen size was crucial for me. I wanted something that would fit well with my Raspberry Pi Zero setup without overwhelming it. I also paid attention to resolution; a higher resolution offers better clarity, which is essential for detailed projects. I made sure to balance size and resolution to fit my needs.
Interface Compatibility
Compatibility with the Raspberry Pi Zero was a major concern for me. The display I selected needed to connect seamlessly to the GPIO pins or HDMI port. I researched different connection types to ensure that my display choice would work effortlessly with my existing setup.
Power Requirements
Power consumption played a significant role in my decision-making process. I wanted to ensure that my Raspberry Pi Zero could support the display without requiring additional power sources. I looked for displays that were energy-efficient, as this would help me maintain a compact and reliable system.
Cost Considerations
Budgeting was essential for my project. I set a limit on how much I was willing to spend on a display. While I wanted quality, I also needed to find a product that offered good value for money. I compared different options within my budget to find a balance between cost and functionality.
Additional Features
I also considered any extra features that might enhance my experience. Touchscreen capabilities, for instance, could add interactivity to my project, while built-in speakers could enhance multimedia applications. I evaluated which features would genuinely benefit my projects and ultimately decided which were worth the investment.
Community Support and Resources
Before making my final choice, I looked into the community support available for the displays I was considering. I found that a strong community could provide valuable resources, tutorials, and troubleshooting advice. This support gave me confidence that I could successfully integrate the display into my projects.
Final Thoughts
After thoroughly researching and considering all these factors, I felt well-equipped to choose a Raspberry Pi Zero display that would meet my needs. By understanding my requirements, evaluating options, and considering practical aspects, I was able to make an informed decision that would enhance my Raspberry Pi projects.
Author Profile

-
James Lewis is a tech-minded reviewer and the voice behind moathothman.com, where he turns hands-on experience into honest product insights. With a background in software engineering and product development, James has spent years understanding what makes good design and functionality truly stand out. In 2025, he shifted his focus from coding to content, channeling that same curiosity into testing everyday gadgets, tools, and home essentials.
Based in Portland, Oregon, James blends his love for technology with a down-to-earth lifestyle surrounded by nature and coffee culture. Whether he’s working at his desk, hiking through the Gorge, or exploring new local finds, every review he writes comes from real use and genuine perspective. His goal is simple – to help readers shop smarter and feel confident about every purchase they make.
Latest entries
- November 25, 2025Personal RecommendationsMy Honest Experience with Better Alt Shilajit: Expert Review and Insights
- November 24, 2025Personal RecommendationsWhy I Trust the LR6 1.5 Volt Battery: An Expert’s Insight on Performance and Reliability
- November 24, 2025Personal RecommendationsWhy I Swear by 1 Gallon of Lacquer Thinner: My Expert Opinion and Personal Experience
- November 24, 2025Personal RecommendationsUnlocking Power: My Personal Experience with a 10 Horsepower Diesel Engine